How to Take Better Phone Photos (Complete Guide)
Published: 3 Mar 2026
Most people carry a smartphone all day, but their photos still look dull, dark, or blurry. This usually happens because they do not use their camera the right way and repeat small but common mistakes. Many people simply tap the button without thinking about light, focus, angle, or background. In this guide, you will learn how to take better phone photos using simple and practical steps that anyone can follow. By the end, you will know easy tricks that can instantly improve your pictures and make them look sharp, bright, and professional.
Why Your Phone Photos Don’t Look Professional
Have you ever taken a photo that looked great in real life but bad on your screen? Don’t worry. You are not alone. Small mistakes can ruin a photo, even if you have a good phone. Let’s look at the main reasons.
Bad Lighting
Light is everything in photography. If your photo is too dark or too bright, it will not look good. Many people take pictures in low light without realizing it. For example, indoor photos at night often look grainy. Try standing near a window during the day for softer and clearer light.
Wrong Angle
Angle changes everything. If you shoot from too high or too low, the photo may look awkward. For example, taking a face photo from below can look unflattering. Move around your subject and test different angles. A small shift can make a big difference.
No Composition
Composition means how things are placed in your photo. If the background is messy, the photo looks distracting. Imagine taking a picture of your friend with trash bins behind them. It ruins the vibe. Always check what is in the background before you click.
Dirty Lens
This is a very common mistake. Your phone stays in your pocket or bag all day. The lens gets fingerprints and dust. Even a small smudge can make your photo look blurry. Quickly wipe the lens with a clean cloth before taking a picture.
Auto Mode Mistakes
Auto mode is helpful, but it is not perfect. Sometimes it makes the photo too bright or too dark. It may also focus on the wrong object. Tap on the screen to set the focus yourself. This simple step can instantly improve your photo.
Now that you know the problems, are you ready to fix them? Let’s move to the solutions.
How to Take Better Phone Photos (Step-by-Step Method)
Now let’s talk about the real solution. If you truly want to learn how to take better phone photos, you need to follow a simple step-by-step method. These steps are easy, practical, and work on almost every smartphone. Let’s start.
Step 1 – Clean Your Lens (Most Ignored Hack)
This is the most ignored trick. Your phone lens gets dust and fingerprints all day. Even a small smudge can make photos look blurry or foggy. Before taking a picture, wipe the lens with a soft cloth or your shirt. It takes only 3 seconds but makes a huge difference.
Step 2 – Use Natural Light the Right Way
Good light makes photos look professional. Stand near a window during the day for soft and clear light. Do not stand with bright light behind you, or your face will look dark. For example, if you take a selfie with the sun behind you, the photo will look shadowy. Always face the light for better results.
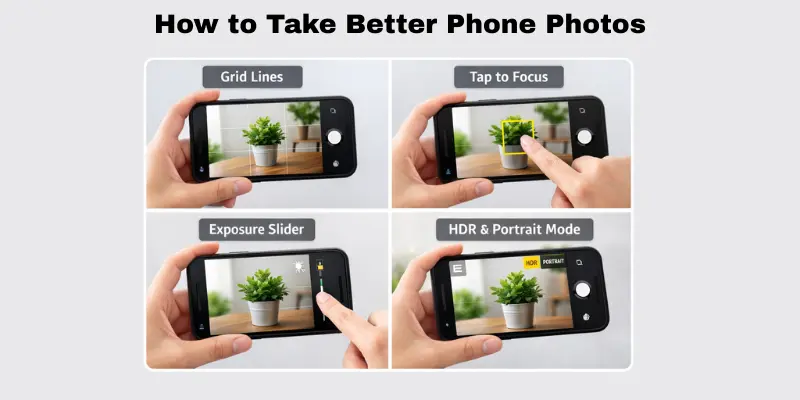
Step 3 – Turn on Grid Lines (Rule of Thirds)
Most phones have a grid option in camera settings. Turn it on. The grid helps you place your subject in a better position. Try placing the main object slightly to the left or right, not in the center. This simple trick makes your photo look balanced and interesting.
Step 4 – Tap to Focus & Adjust Exposure
Do not rely fully on auto mode. Tap on the screen where you want the focus. After tapping, slide your finger up or down to adjust brightness. This helps you control light and sharpness. It is a small step, but it is key if you want to master how to take better phone photos like a pro.
Step 5 – Use HDR & Portrait Mode Properly
HDR helps when there is very bright and very dark light in one photo. It balances the exposure. Use it for outdoor shots, like sky photos. Portrait mode is great for people photos. It blurs the background and keeps the face sharp. But use it in good light for the best result.
If you follow these five steps every time, you will clearly see improvement. This is the simple system behind how to take better phone photos without buying an expensive camera. Ready to try it today?
How to Make Better Photo Quality with Proper Lighting
Good lighting can completely change your photos. If you want to learn how to take better phone photos, understanding light is the first step. Many photos look dull or harsh because of poor lighting, not because of your phone. Here are simple ways to fix it.
Front Lighting vs Side Lighting
The direction of light affects how your subject looks. Front lighting makes your photo bright, while side lighting adds depth and mood. Understanding both helps you choose the right style for your shot.
- Face the light source for clearer, brighter photos.
- Use a side light to create soft shadows and depth.
- Avoid mixing strong front and side lights.
Avoid Overhead Harsh Light
Strong light from above can create unwanted shadows and make your subject look harsh. Avoid taking photos under direct top light and use softer light whenever possible.
- Do not take photos under direct noon sunlight.
- Avoid strong ceiling lights directly above your head.
- Move to a shaded area for softer light.
Golden Hour Trick
Golden hour is a special time for photography. The soft, warm light makes photos look magical and professional without extra effort.
- Shoot photos shortly after sunrise.
- Take pictures just before sunset.
- Use this light for portraits and outdoor shots.
Indoor Window Lighting Hack
Natural light from a window is one of the easiest ways to improve your photos. It works like professional lighting and is free!
- Stand near a window during the day.
- Let light fall on your face from the front or side.
- Turn off strong indoor lights to avoid color mix.
How to Take Better Pictures of Yourself (No Photographer Needed)
Want to look great in your photos without hiring a photographer? Learning how to take better phone photos of yourself is easier than you think. With a few simple tricks, you can take sharp, flattering selfies or self-portraits using just your phone. Let’s explore practical tips to make your self-photography look professional.
Best Angles for Self Portraits
Finding the right angle can make a big difference. The right tilt or side can enhance your features and make the photo more flattering.
- Hold your phone slightly above eye level for a natural look.
- Turn your face slightly to the side, not straight to the camera.
- Experiment with head tilts to find your best angle.
Natural Light Positioning
Lighting is key to a beautiful self-photo. Proper light can brighten your face and create soft, flattering shadows.
- Face a window for soft, natural light.
- Avoid harsh overhead or backlight that creates shadows.
- Move around to see which light highlights your features best.
Timer vs Mirror Trick
You don’t always need someone to click the photo. These tricks help you capture the perfect shot alone.
- Use your phone timer for hands-free photos.
- Prop your phone on a stable surface or tripod.
- Use a mirror for composition guidance and framing.
Posing Tips That Look Natural
Natural poses make photos more engaging and less stiff. Small adjustments can improve your self-portrait instantly.
- Relax your shoulders and keep your posture straight.
- Slightly bend your arms or legs for a casual look.
- Smile naturally or give a subtle expression that matches your mood.
How to Take Good Photos of People Like a Pro
Taking great pictures of friends or family doesn’t require a fancy camera. Knowing how to take better phone photos of people is all about technique, light, and connection. With a few simple tips, you can make your subjects look natural, lively, and professional. Here’s how to do it.
Make Them Comfortable
A relaxed subject always looks better in photos. If people feel stiff, the photo will feel unnatural.
- Talk to them and make them laugh before shooting.
- Avoid giving too many strict instructions.
- Let them move naturally and capture candid moments.
Capture Movement
Motion adds life to your photos. Even small actions can make a shot dynamic and interesting.
- Photograph them while walking, playing, or interacting.
- Use burst mode to catch the perfect moment.
- Slightly blur the background to emphasize motion.
Use Portrait Mode Correctly
Portrait mode helps separate your subject from the background. Proper use makes photos look professional.
- Ensure good lighting to avoid grainy images.
- Keep your subject at the recommended distance for your phone.
- Use portrait mode to create soft, beautiful background blur.
Focus on Eyes
Eyes are the most important part of a portrait. Sharp eyes make your photo engaging.
- Tap the screen on the eyes to set focus.
- Adjust exposure if the face is too bright or dark.
- Encourage your subject to look naturally at the camera or slightly away.
Using these tips consistently will help you take better phone photos of people every time. Practice makes a big difference, and soon your portraits will look like they were taken by a pro.
How to Take Good Product Photos with Your Phone
Want to showcase products online or make small business photos look professional? Learning how to take better phone photos for products is easier than you think. With a few tricks, you can make any item look clean, sharp, and appealing without expensive cameras. Here’s a step-by-step guide.

Simple Background Setup
A clean background makes your product the star of the photo. Too much clutter distracts the viewer.
- Use a plain wall or a simple tabletop for your product.
- Avoid busy patterns that compete with the item.
- Keep surrounding objects out of the frame for a professional look.
Use White Chart Paper Trick
White chart paper works like a mini studio. It reflects light evenly and makes products pop.
- Place your product on a white chart paper sheet.
- Fold the paper slightly to create a seamless background.
- Use natural light from a window for softer, professional results.
Best Angles for Products
Angles change how the product is perceived. Experiment to find the most appealing view.
- Shoot from slightly above for flat lay or top-down shots.
- Capture close-ups to show details and textures.
- Try different side angles to highlight shape and depth.
Editing Apps for a Clean Look
Small edits can make a huge difference. A few tweaks can turn an average shot into a high-quality photo.
- Adjust brightness, contrast, and sharpness lightly.
- Crop unnecessary space to focus on the product.
- Avoid heavy filters that distort true colors.
Following these tips will help you consistently take better phone photos of products. Even with a simple phone, your photos can look professional, clean, and eye-catching.
How to Take Good Photos Using Manual Camera Settings
Want to level up your photography skills? Learning how to take good photos using manual camera settings can make a huge difference. Even on a phone, small adjustments can make your shots brighter, sharper, and more professional. Here’s a simple guide.
ISO Basics
ISO controls how sensitive your camera is to light. Higher ISO brightens photos in low light, but too high an ISO can create noise.
- Use a low ISO in bright daylight for sharp images.
- Increase ISO slightly in dim light, but avoid grainy results.
- Test your phone’s ISO range to see what works best.
Exposure
Exposure affects how light or dark your photo looks. Adjusting it correctly can fix dull or overly bright images.
- Increase exposure slightly in shadows for more detail.
- Reduce exposure in very bright light to avoid washed-out areas.
- Tap the screen to focus and then slide for exposure adjustment.
White Balance
White balance makes colors look natural. Wrong settings can make your photo too yellow, blue, or green.
- Use auto white balance for most situations.
- Adjust manually for tricky lighting, like sunset or fluorescent indoor light.
- Keep skin tones and product colors accurate.
When to Use Pro Mode
Pro mode lets you control ISO, exposure, focus, and white balance together. Use it when you want precise control over the shot.
- Try it for portraits, landscapes, or low-light scenes.
- Combine with a tripod for steady, sharp images.
- Experiment to learn how small changes affect the final photo.
Using these manual settings will help you take good photos that look professional and polished, even without expensive equipment.
10 Hidden Tricks to Take Better Phone Photos Instantly
Want to instantly improve your shots? These are advanced tricks most guides miss, and they can make a big difference. By using these tips, you can quickly take better phone photos that look sharp, professional, and eye-catching.
Shoot Slightly Underexposed
Shooting a little darker preserves details in bright areas.
- Prevents washed-out skies or highlights.
- Helps maintain texture in bright objects.
- Adjust exposure slightly before clicking.
Use Burst Mode for Moving Subjects
Burst mode captures multiple shots in seconds.
- Perfect for kids, pets, or sports action.
- Pick the best frame from the series.
- Reduces the chance of blurry photos.
Use Volume Button as Shutter
Avoid shaky hands by using your volume button.
- Press the button instead of tapping the screen.
- Works in portrait or landscape mode.
- Keeps the phone steady for sharper shots.
Avoid Digital Zoom
Digital zoom reduces image quality.
- Instead, move closer to your subject.
- Cropping later keeps sharpness intact.
- Only use optical zoom if your phone supports it.
Shoot from Lower Angle
Changing your angle can make a photo more dramatic.
- Get closer to the ground for unique perspectives.
- Makes subjects appear taller or more dynamic.
- Works great for street photography or products.
How to Take Good Photos at Night with a Phone
Night photography can be tricky, but you don’t need a professional camera. Learning how to take better phone photos at night can help you capture sharp, clear, and vibrant shots even in low light. With the right tricks, your night photos will look stunning.
Night Mode
Most modern phones have a night mode to improve low-light shots.
- Turn on night mode for darker scenes.
- Hold your phone steady while the photo is processing.
- Experiment with different lighting to see what works best.
Use Stable Surface
Camera shake is the biggest enemy at night.
- Place your phone on a table, wall, or tripod.
- Avoid holding it in your hands for long exposures.
- Even a small shake can blur your photo.
Reduce Movement
Subjects moving at night can appear blurry.
- Ask people or pets to stay still.
- Capture objects that are stationary for sharper results.
- Combine with burst mode for moving subjects.
Manual Exposure Trick
Adjusting exposure manually can improve night photos.
- Lower exposure slightly to avoid bright lights blowing out.
- Increase exposure for dark areas carefully.
- Tap the screen to focus before adjusting for the best results.
7 Composition Rules That Instantly Improve Phone Photos
Great photos aren’t just about light or focus—they’re about composition. Learning how to take better phone photos means understanding a few simple rules that make your shots look professional. These techniques help guide the viewer’s eye and make your photos more appealing.
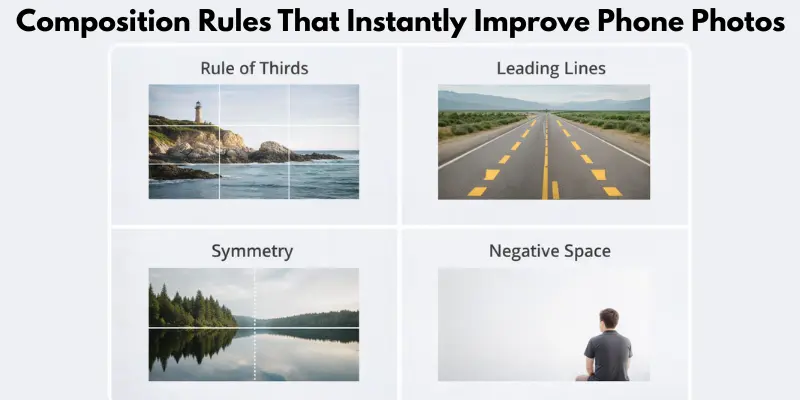
Rule of Thirds
Divide your frame into nine equal parts and place your subject along the lines or intersections.
- Makes photos balanced and interesting.
- Avoids placing subjects in the exact center.
- Works for portraits, landscapes, and objects.
Leading Lines
Use natural lines to guide the viewer’s eyes toward the subject.
- Roads, fences, or rivers can create strong lines.
- Leads attention to the main object in the photo.
- Adds depth and perspective.
Framing
Frame your subject using elements in the scene.
- Use windows, doorways, or branches as natural frames.
- Focus attention on the main subject.
- Makes photos look more organized and artistic.
Negative Space
Leave space around your subject to make it stand out.
- Prevents cluttered photos.
- Highlights your main object or person.
- Creates a minimalist and clean look.
Symmetry
Symmetrical photos feel balanced and pleasing.
- Look for reflections, architecture, or natural symmetry.
- Centering the subject often works well here.
- Adds a professional and polished feel.
Fill the Frame
Get close to your subject to fill the frame with it.
- Eliminates unnecessary background distractions.
- Focuses attention on details and textures.
- Works great for portraits and products.
Depth
Create a sense of depth by including foreground, middle ground, and background.
- Adds dimension and makes the photo more engaging.
- Use objects in the foreground to lead the eye.
- Helps your photos feel more dynamic and real.
Apply these seven composition rules consistently, and you’ll instantly see how to take better phone photos that look professional, clean, and eye-catching.
Conclusion
Taking great photos with your phone is easier than it seems. By following these tips—lighting, angles, composition, and hidden tricks—you can improve your shots instantly. The key is to practice regularly and experiment with different techniques. With time, you’ll clearly see how to take better phone photos that look sharp, bright, and professional every time. Keep shooting and have fun!
FAQs
Use natural light from windows whenever possible. Avoid overhead lights that create harsh shadows. Keep the background clean and use a stable surface or tripod for sharper shots.
Focus on lighting, angles, and composition while taking the photo. Clean your lens and use natural light smartly. Avoid digital zoom and keep your phone steady for sharper results.
Use the timer or a stable surface to hold your phone. Stand near a window for natural light. Experiment with angles and poses to find your best look.
Use a simple background or white chart paper. Position your product in natural light and try different angles. Use portrait mode or slight edits to enhance sharpness and colors.
Avoid harsh overhead sun. Position your subject facing or slightly angled to soft light. Use shadows creatively, and consider shooting during golden hour for the best results.
Use night mode if your phone has it. Place your phone on a stable surface or tripod. Reduce movement and adjust exposure manually for brighter, sharper shots.
Clean your lens first to remove dust or fingerprints. Use tap-to-focus and hold the phone steady while shooting. Avoid digital zoom and try to increase the lighting for clearer results.


- Be Respectful
- Stay Relevant
- Stay Positive
- True Feedback
- Encourage Discussion
- Avoid Spamming
- No Fake News
- Don't Copy-Paste
- No Personal Attacks
- Be Respectful
- Stay Relevant
- Stay Positive
- True Feedback
- Encourage Discussion
- Avoid Spamming
- No Fake News
- Don't Copy-Paste
- No Personal Attacks
